PIC Tutorials.MplabX- Interfacing 7 Segment LED
There are 2 types of seven segment displays – CC (Common Cathode) & CA (Common Anode).In this post we shall see how to interface CA display with PIC 16F877A.
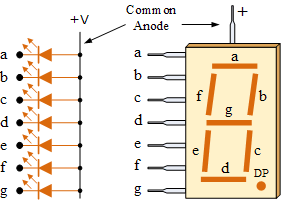
The display , as the name indicates , is made up of seven segments of LED.Each one of the seven LEDs in the display is given a positional segment with one of its connection pins being brought out of the plastic package. These LED pins are labeled from “ a “ to “ g“ representing each individual LED. The other LED pins are connected together and wired to form a common pin.
In case of CA display +5v is tied to Common pin.
The common pin is generally used to identify which type of 7-segment display it is. As each LED has two connecting pins, one called the “Anode” and the other called the “Cathode”, there are therefore two types of LED 7-segment display called: Common Cathode (CC) and Common Anode(CA).
Common anode displays are more popular as many logic circuits can sink more current than they can source.
Depending upon the decimal digit to be displayed, the particular set of LEDs is forward biased. For instance, to display the numerical digit 0, we will need to light up six of the LED segments corresponding to a, b, c, d, e and f. Then the various digits from 0 through 9 can be displayed using a 7-segment display as shown.
For a Common Anode Display , the COMMON pin should be connected to HIGH & the corresponding DIGIT segments should be made LOW.Each LED segment can tolerate up to only 1.5v DC .
As the HIGH level from PIC is around 5V , a current limiting resistor of 470 ohms must be used at the common pin.
For e.g., to display digit 1 , the segments b & c should be made LOW while the COM pin is made HIGH.
To display digit 2 , the segments a,b,d,e & g are made LOW while making the COM pin HIGH.
Then for a 7-segment display, we can produce a truth table giving the individual segments that need to be illuminated in order to produce the required decimal digit from 0 through 9 as shown below.
CONNECTIONS : All segment pins are Enabled by LOW (0)
Common Anode pin made HIGH to display a Digit.
RB7—> D7 RB0 –> D0
RB3 –> D3 RB6 –> D6
RB2 –> D2 RB5 –> D5
RB1 –> D1 RB4 –> D4
Open a New project in MPLABX & follow the initial steps as described in previous post.
The code to drive a single Display is given below.CONFIG statements to be replaced by the code generated for configuration bits as described in earlier post.
——————————————————————
#define _XTAL_FREQ 16000000
#include <xc.h>
#include <xc.h>
// CONFIG statements here….
unsigned char hexValue[10]={0x03,0x9F,0x25,0x0D,0x99,0x49,0x41,0x1F,0x01,0x09};
int i=0;
int i=0;
int main()
{
TRISB=0x00; // Port B pins all OUTPUTs
{
TRISB=0x00; // Port B pins all OUTPUTs
while(1)
{
for( i=0; i<10; i++)
{
PORTB= hexValue[i];
__delay_ms(1000);
}
}
}
{
for( i=0; i<10; i++)
{
PORTB= hexValue[i];
__delay_ms(1000);
}
}
}
Circuit Diagram


No comments:
Post a Comment